 |
| Lightweight Leaf Earrings by Patricia Roberts-Thompson |
This
month, I had fun making these cute lightweight earrings from Makin’s Clay® Fun
and easy to do!
Project Materials:
60g White Makin’s Clay®
Makin’s® Push Mold, 39001 Leaves
Makin's Professional® Ultimate Clay Machine®
Clay roller, clay blade, scissors,
brushes, needle tool or Sculpey® Etch and Pearl
tool
Acrylic paints, CraftSmart - Sage Green, Olive Green, Ocean breeze,
Orchid, Plum
FolkArt – Brushed Gold, Solid Bronze, Black
American DuraClear Matte varnish
Jewelry findings – 7mm jumprings, 2”
eyepins, earring findings. 6mm pearls, or 3x5mm crystal rondells
¾” round cutter ( Kemper ), or ½” round
cutter
Directions:
 Fig 1: Roll
approximately 30g of white Makin’s Clay® on the thickest setting of the
Ultimate Clay Machine®. Using a clay blade, score lines on the clay, in all
directions using both the sharp edge and the back of the blade. Don’t cut right
through, but you want nice crisp lines, straight or slightly curved. If you
have rolled too much clay, place half of it in a moist baby wipe until needed.
Turn the textured sheet over and cut two round circles for each earring. I
always turn the sheet to the back side for cutting because if the clay gets
caught in the cutter, you won’t make a mark on the front when you push it out.
If you are only making one pair of earrings you probably have enough of the
sheet to proceed to the Fig 2 step. I made three pairs with my sheet, a total
of 12 circles. I liked both sizes of cutters equally.
Fig 1: Roll
approximately 30g of white Makin’s Clay® on the thickest setting of the
Ultimate Clay Machine®. Using a clay blade, score lines on the clay, in all
directions using both the sharp edge and the back of the blade. Don’t cut right
through, but you want nice crisp lines, straight or slightly curved. If you
have rolled too much clay, place half of it in a moist baby wipe until needed.
Turn the textured sheet over and cut two round circles for each earring. I
always turn the sheet to the back side for cutting because if the clay gets
caught in the cutter, you won’t make a mark on the front when you push it out.
If you are only making one pair of earrings you probably have enough of the
sheet to proceed to the Fig 2 step. I made three pairs with my sheet, a total
of 12 circles. I liked both sizes of cutters equally.
Fig2:
Put two circles together, with
the texture to the outside. Use a bit of water if they seem a bit too dry to
stick. Roll the clay again, and repeat the texturing process, then using a
straight blade, cut several strips that are 3 to 4mm wide. The measurement
should cover the seam of the disk, leaving a slight edge of the top and bottom
disk showing. To get the strips to adhere well, I moistened the back of them
with water. Apply the strips to the sides of the disk, trimming where
necessary. I used my blade to texture the joint to help disguise it. Poke a
hole in the center of each disk, and let dry.

Fig3: Roll
the remaining clay on the number 3 setting of the Ultimate Clay Machine®. For
one set of earrings, I used my blade to cut two long leaf-feather shapes.
Another pair, I used a Football shaped cutter to cut two leaf shapes, and on
the third earring I used the Makin’s Push Mold® Leaves. For that one, I tore
off small pieces of clay, pushed it into the small roundish leaf in the lower
left side, then, used scissors to cut out the shape. I used two of leaves to
make up one leaf, putting them together with the textured side out.

Fig 4: I
placed each leaf on a foam mat ( fun foam works great! ) and made a center vein
and lines on both sides of the center with a needle tool or the smallest Etch
and Pearl tool by Sculpey. Flip it over and repeat the lines. The long leaves
were twisted in opposite directions, just for a bit of interest.

Fig 5: Poke a hole in the leaves and
disks and leave them to dry for 24 hours.
Painting the earrings:
Fig 6:
From left to right, the first pair is painted with black acrylic paint,
rubbed off while still wet with a paper towel, then again with a moist baby
wipe. Leave the black lines in the texturing. Keep using a clean spot on the
baby wipe as you remove the excess paint for best results. When the disk is
dry, you can lightly sand them if you haven’t removed enough paint, but it’s
easier to keep wiping until you reveal the white clay. Second pair was painted
with Olive Green acrylic paint in the same manner. Third pair was painted with
Plum acrylic paint, again in the same manner. If you like what you have, you
can certainly stop at this stage!
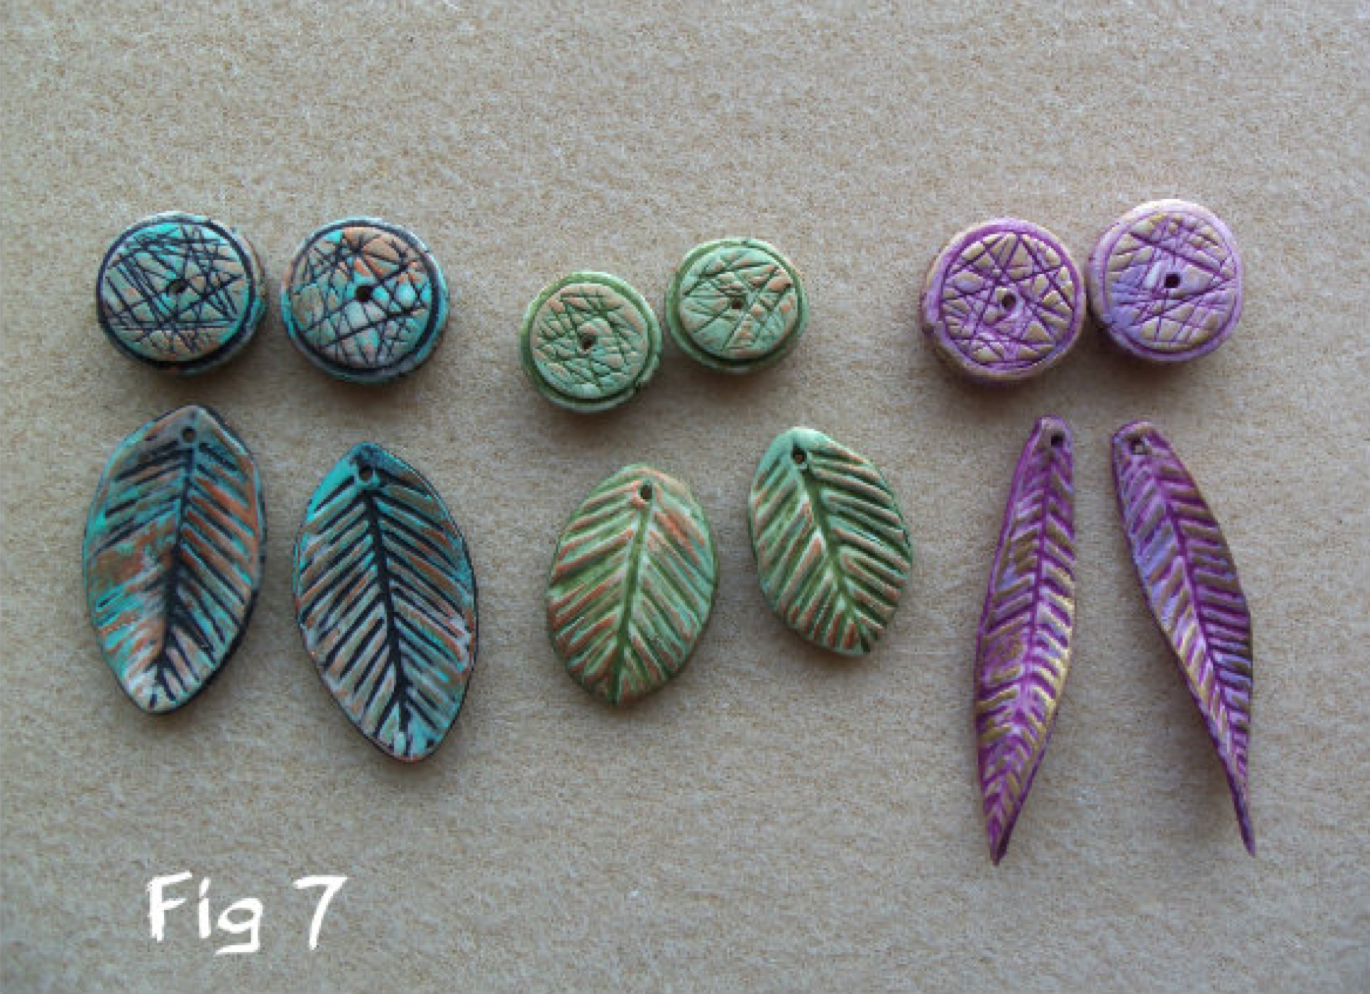
Fig 7: I
added a couple of more colors to each earring using my fingers to lightly brush
over the texture to avoid getting the color in the grooves. Dab a bit of the
excess paint off your finger before applying it to the clay pieces. From Left to right, the first pair was lightly
dabbed with Ocean Breeze acrylic paint, then, followed with Solid bronze paint.
Copper would have been nice here as well. The middle pair was painted with Sage
Green paint, and Solid Bronze added on top. The third pair was painted with
Orchid acrylic paint, followed with Brushed Gold paint.
Let them dry thoroughly, then seal them.
I used Americana DuraClear Matte varnish which is one of my favorite varnishes
for this kind of project. It should be stirred each time you use it. It’s not
completely matte, just enough sheen!

Assembly:
Put a small jumpring
( 7m ) through the hole in the leaf and add a 2 inch eyepin before
closing the jumpring. Thread on a crystal or a pearl, the textured disk, and
another crystal or pearl. Make a simple loop or a wrapped loop and attach it to
your earring finding.
These earrings have great movement and
are very light and easy to wear! Have fun making them in your own colors!

No comments:
Post a Comment